

As I stood in my kitchen, the vibrant colors of Halloween-inspired snacks began to come alive before my eyes. This Spooky Halloween Snack Board for Kids is a celebration of creativity and health, packed with fun, fruity, and slightly eerie treats that children will adore. One of the best parts? It’s effortless to whip up, making it a perfect choice for busy parents wanting to ditch fast food in favor of something homemade. Whether you opt to assemble the entire board or focus on a few standout snacks, this recipe balances nutrition and whimsy, offering a healthier twist on holiday snacking. Ready to create a memorable, festive treat that your little ghosts and goblins will love? Let’s dive into the spooky fun!
Why Will Kids Love This Halloween Snack Board?
Fun and Festive: This snack board brings the spirit of Halloween to life with its vibrant colors and playful shapes, making it irresistible to kids.
Healthy Treats: Packed with fruits and veggies, it’s a guilt-free option that parents will appreciate.
Easy Assembly: In just a short amount of time, you can create a stunning spread that requires minimal effort—perfect for busy parents looking to replace fast food.
Versatile Choices: Choose from six varied snack ideas, allowing even picky eaters to find something they’ll enjoy; you can personalize the board with your kid’s favorites!
Visual Appeal: The colorful arrangement and spooky elements make it a fantastic centerpiece for Halloween parties, sparking excitement while keeping it nutritious.
Kid-Approved: Health meets fun in this unique board—serve it at playdates or family gatherings to impress and delight! For more healthy snack ideas, check out the Peachy Oat Snack for a delicious addition.
Halloween Snack Board Ingredients
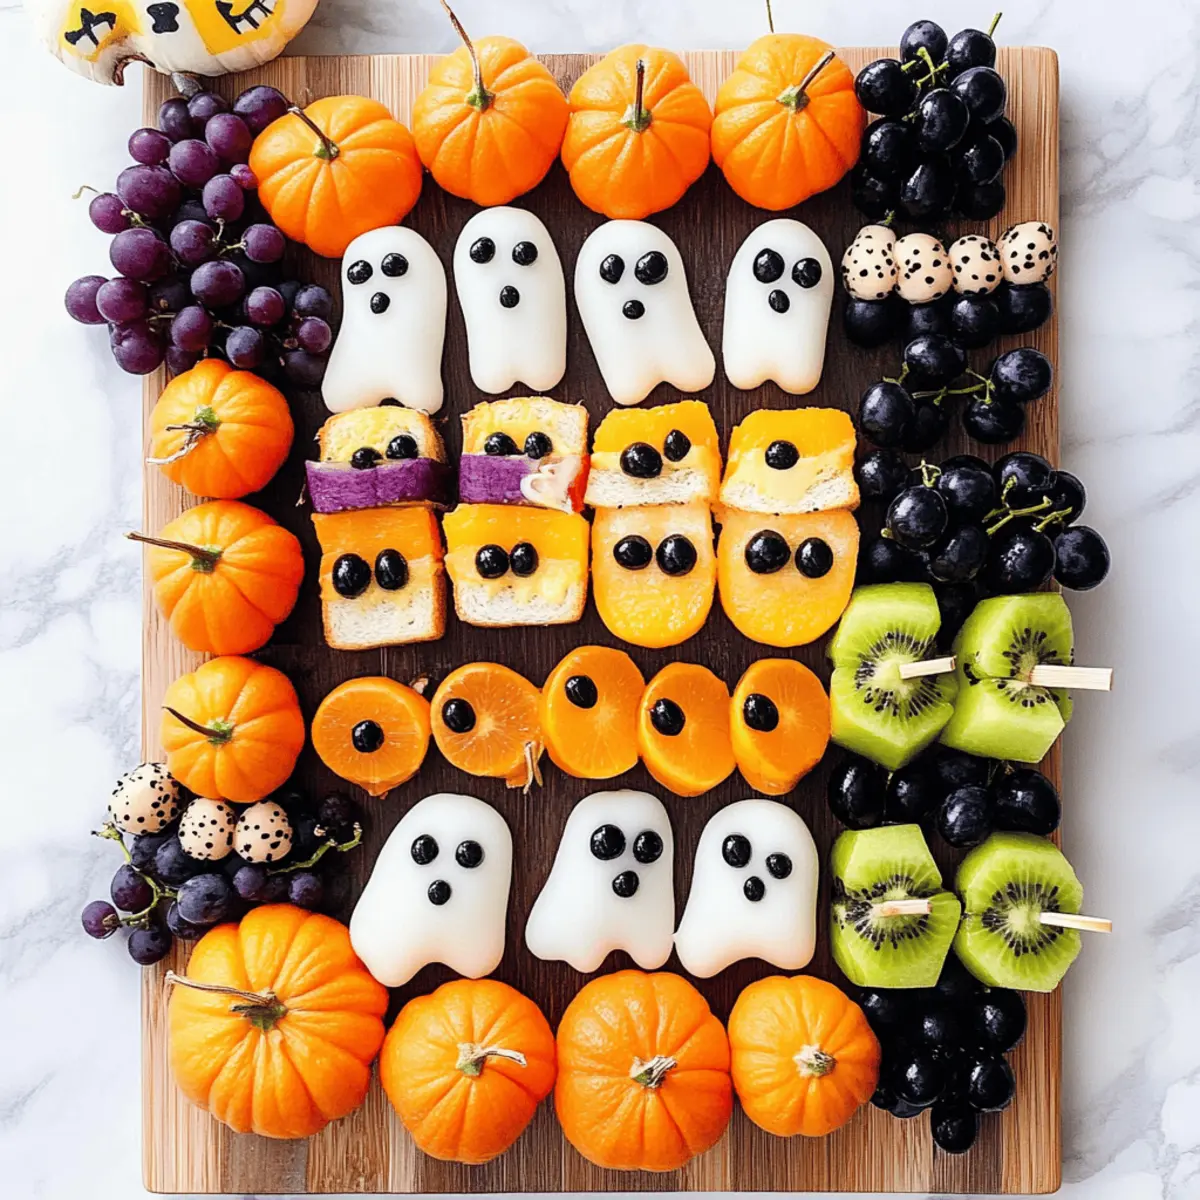
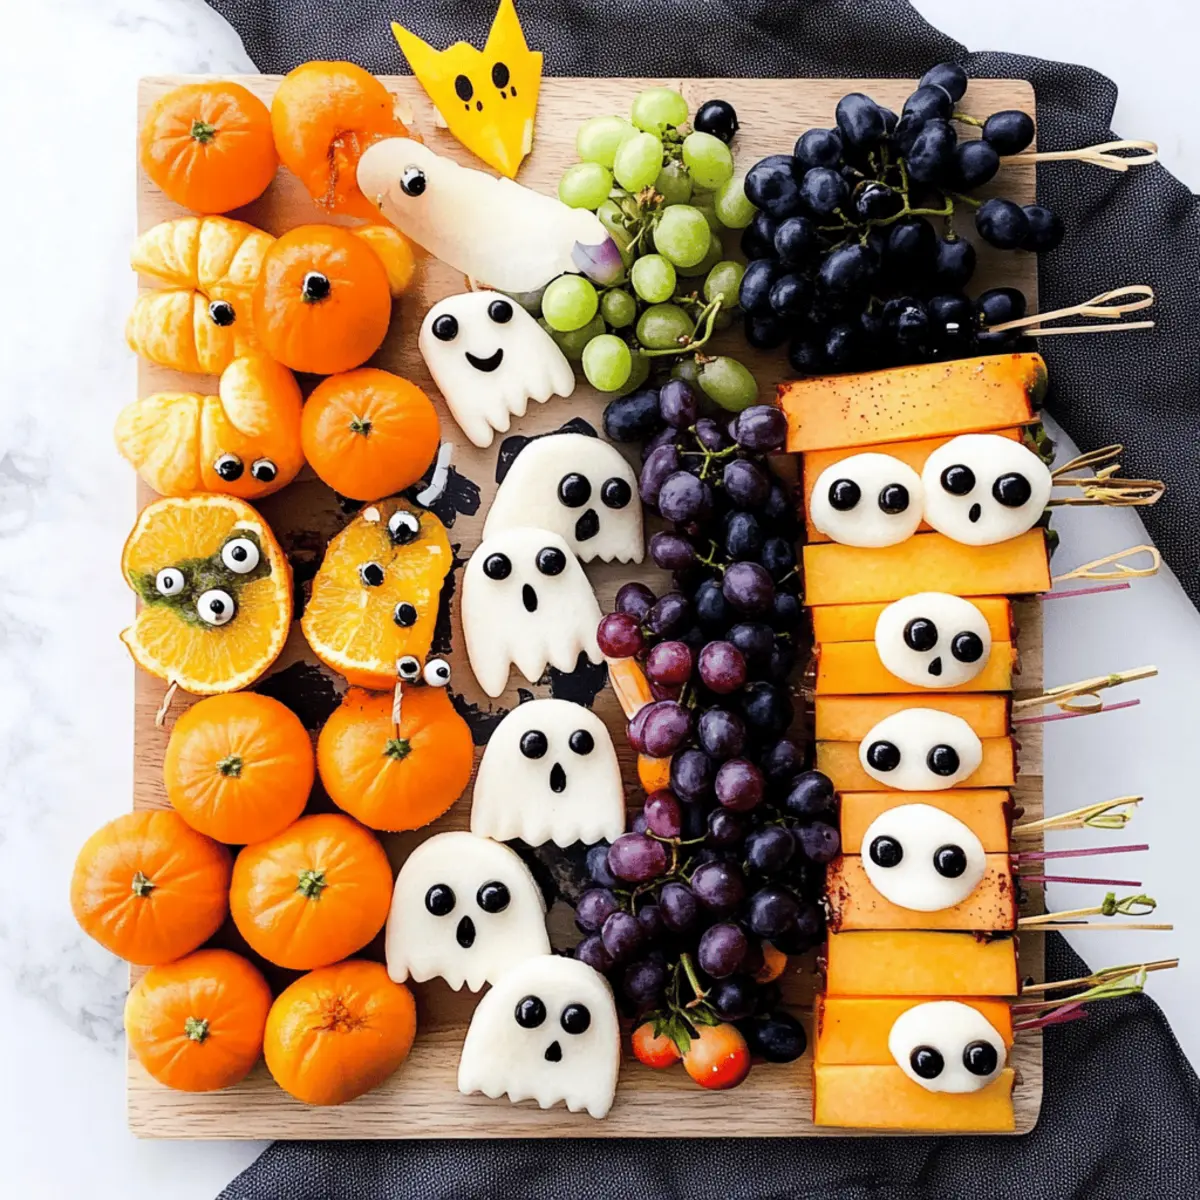
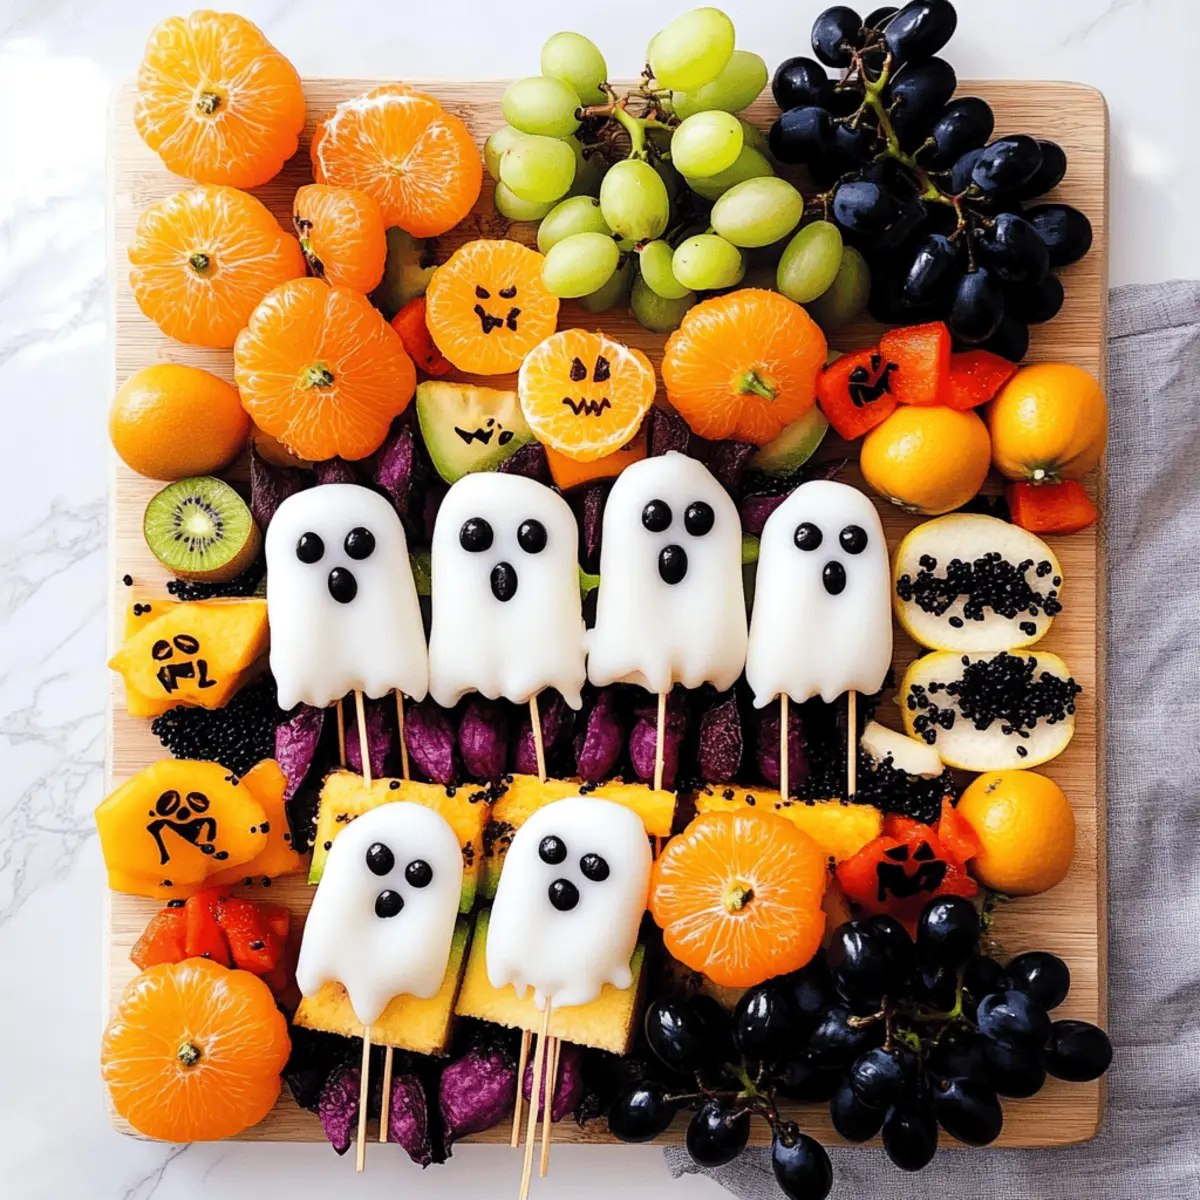
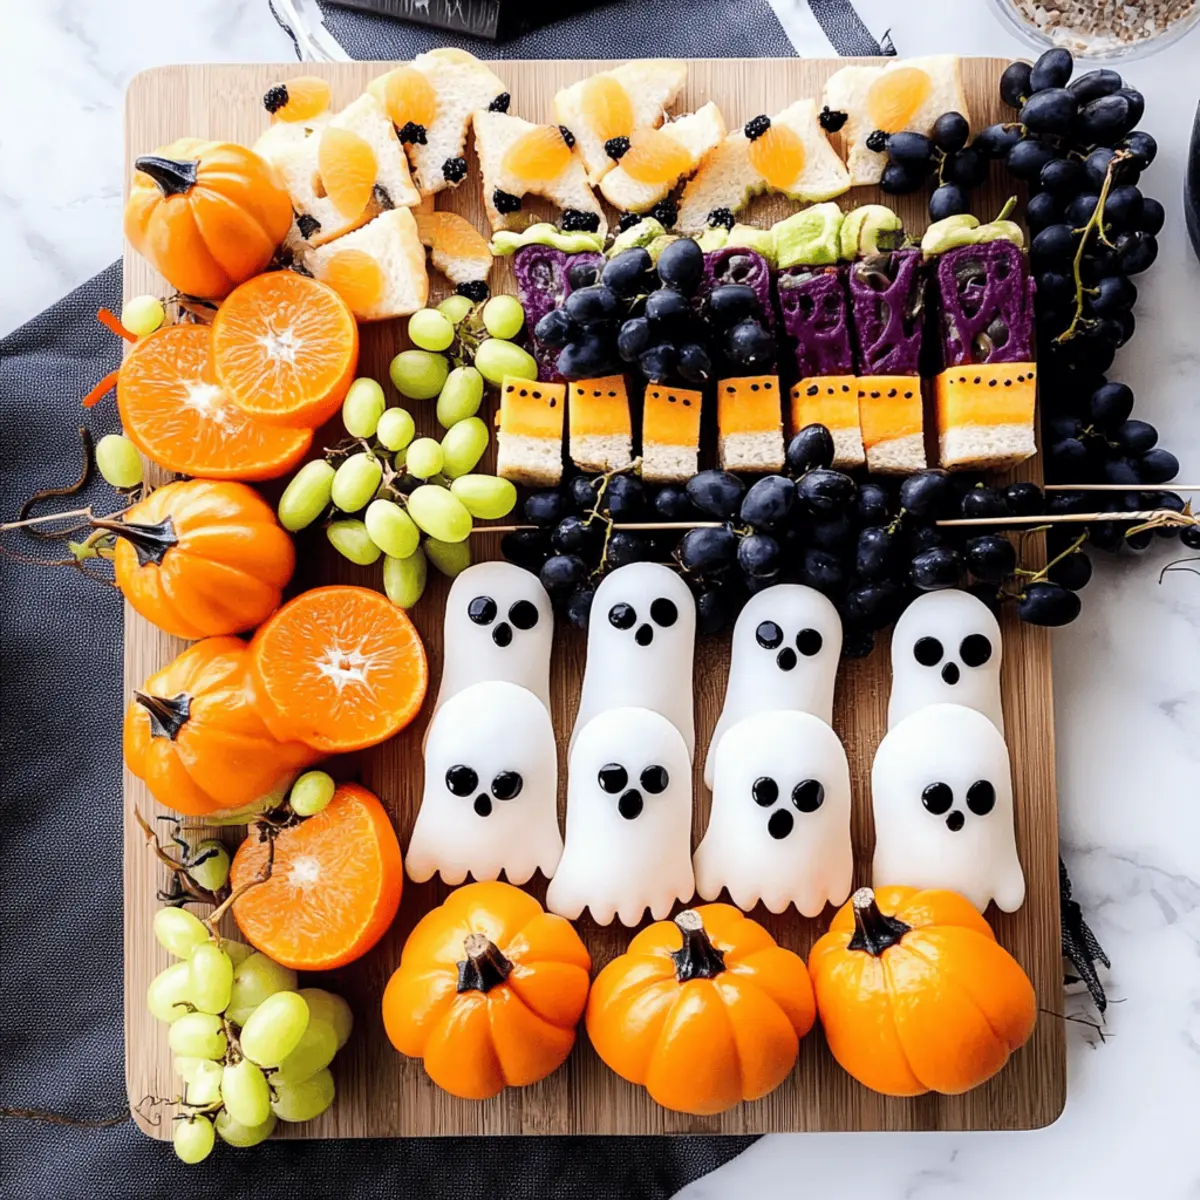
For the Clementine Pumpkins
- Clementines – Sweet, juicy base that forms pumpkin-like shapes; Mandarin oranges may be used as a substitute.
- Celery Stick – Provides the pumpkin “stalk” and adds crunch; any sturdy veggie like cucumber can work instead.
For the Ghostly Snacks
- Sweet Mini Peppers – Create spooky ghost snacks; medium-sized bell peppers can stand in if mini ones aren’t available.
- Icing Sugar and Cold Water – Used to make thick icing for “gluing” on sugar eyes; pre-made cake decorating gel can be used as a shortcut.
- Edible Sugar Eyeballs – Essential for adding ghost eyes for decoration; can be omitted for simpler ghosts if desired.
For the Festive Skewers
- Cantaloupe Melon – Main fruit for skewers, adding delightful sweetness; honeydew melon can also be a great substitute.
- Black Grapes – Adds color and fruitiness to skewers; any dark, small fruit like blueberries can replace them.
- White Marshmallows – Serve as “ghost” heads on skewers; use any soft candy in case marshmallows are unhandy.
- Dark Chocolate Chips – Perfect for drawing faces on marshmallows; melted white chocolate offers a fun contrast if preferred.
For the Zombie Mouths
- White Bread – Base for ghost-shaped sandwiches; whole wheat or gluten-free bread makes for healthy alternatives.
- Smooth Thick Peanut Butter – Holds apple slices together for zombie mouths; any nut or seed butter of similar consistency can be used.
- Mini Marshmallows (white) – Serve as “teeth” for zombie apple mouths; opt for cut-up grapes for a healthier choice.
- Black Olives – Used for ghost sandwich eyes; consider any small dark fruit for a quick substitution if needed.
For the Ghostly Figures
- Bananas – Shape into ghostly figures; prepare close to serving time to prevent browning.
For the Board Completion
- Assorted Shop-bought Snacks – Fill out the board for variety; opt for healthier choices when possible for a balanced feast.
This Halloween Snack Board will surely be a hit with kids and parents alike, blending fun, festivity, and nutritious ingredients into one delightful spread!
Step‑by‑Step Instructions for Halloween Snack Board
Step 1: Prep Clementine Pumpkins
Start by peeling about 8-10 clementines, ensuring you keep them whole. Cut celery sticks into 2-inch pieces to serve as the pumpkin stalks. Gently insert the celery pieces into the tops of the clementines, creating adorable little pumpkin heads. Once all your pumpkin clementines are ready, wrap them in plastic wrap and chill in the refrigerator for at least 30 minutes.
Step 2: Make Ghost Peppers
In a small bowl, combine 1 cup of icing sugar with a few tablespoons of cold water, mixing until you achieve a thick yet smooth consistency. Dip the top of each sweet mini pepper into the icing, then quickly attach edible sugar eyeballs on the wet icing. Place your ghostly peppers on a baking sheet lined with parchment paper and refrigerate for about 15-20 minutes to set the icing.
Step 3: Prepare Skewers
Grab 2 cups of cantaloupe and dice it into bite-sized cubes. Assemble your skewers by threading cantaloupe pieces, followed by black grapes, and ending with white marshmallows on each skewer. Once all ingredients are assembled, melt ½ cup of dark chocolate chips in the microwave for about 30 seconds, then draw faces on the marshmallows. Let the skewers sit on a plate for the chocolate to set for about 10 minutes.
Step 4: Create Ghost Sandwiches
Using a ghost-shaped cookie cutter, cut slices of white bread into ghost shapes. Spread a thin layer of peanut butter between two ghost slices to form sandwiches. For a spooky touch, use black olives as eyes by cutting them in half and placing them on the sandwiches. Chill these ghost sandwiches in the refrigerator for at least 15 minutes until serving.
Step 5: Assemble Zombie Mouths
Slice 2-3 crisp apples into quarters and fan them out. Spread a generous layer of smooth peanut butter on the inside of each apple slice and stack the quarters back together. Add mini marshmallows along the edge of the apple quarters to create “teeth.” For a ghostly twist, secure the slices together with toothpicks and set aside while you prepare the remaining snacks.
Step 6: Compile Snack Board
On a large serving platter or wooden board, arrange all your prepared snacks creatively. Start with the clementine pumpkins on one side and space out the ghost peppers, skewers, ghost sandwiches, and zombie mouths around them. Fill in any empty spaces with assorted shop-bought snacks to add variety and color. For fun, consider decorating the board with plastic spiders or other Halloween-themed decor before serving.
How to Store and Freeze Halloween Snack Board
Fridge: Store any leftovers from your Halloween Snack Board in an airtight container for up to 1 day to maintain freshness and crunch.
Freezer: Avoid freezing assembled items as they may become soggy; however, individual components like cut fruits can freeze well for up to 3 months—thaw before use.
Reheating: No reheating is necessary; simply enjoy the leftover spooky snacks cold for a quick treat!
Prevent Browning: For the banana ghosts, prepare them just before serving or apply a light drizzle of lemon juice to delay browning when stored in the fridge.
Tips for the Best Halloween Snack Board
-
Be Creative: Experiment with shapes and layouts—placing the clementine pumpkins in clusters can create a more inviting scene on your Halloween Snack Board.
-
Stay Fresh: Prepare the banana ghosts just before serving to avoid browning; a little lemon juice can help if they need to sit for a bit.
-
Ingredient Flexibility: Don’t hesitate to mix and match fruits and veggies based on your kids’ preferences; substitutions ensure the Halloween Snack Board remains fun and appealing.
-
Chill Time: Allow assembled items like the ghost sandwiches and clementine pumpkins to chill for at least 30 minutes—this enhances flavor and makes them more refreshing to eat.
-
Healthier Options: Fill in gaps with healthier store-bought snacks, such as whole grain crackers or popcorn, providing balance without sacrificing fun.
-
Involve the Kids: Let your little ones help assemble the board! It’s a great way to spark excitement and create lasting holiday memories together.
Make Ahead Options
Preparing a Spooky Halloween Snack Board for Kids is a fantastic way to save time and simplify your party prep! You can slice the clementines and celery sticks up to 24 hours in advance, keeping them wrapped tightly in the refrigerator to maintain freshness. Additionally, the ghost peppers can be decorated and refrigerated for up to two days ahead, ensuring they set and are ready to serve. You can also assemble the skewers with cantaloupe, black grapes, and marshmallows and keep them covered in the fridge for up to three days. When it’s time to serve, simply arrange everything on your board and watch the excitement unfold! By prepping ahead, you’ll provide a delightful spread without the last-minute rush, ensuring your Halloween gathering is both festive and stress-free.
Halloween Snack Board Variations
Feel free to get creative with this Halloween Snack Board! Customize it to fit your family’s taste buds and dietary needs.
- Dairy-Free: Use coconut yogurt or dairy-free cream cheese as a spread on the ghost sandwiches for a creamy texture without the dairy.
- Fruit Alternatives: Swap out clementines for pears or pineapples to refresh the fruity base, bringing a new twist to the pumpkin heads!
- Veggie Variations: Replace celery sticks with sturdy cucumber slices for a crunchy stalk or use bell pepper tops for a pop of color.
- Nut Butter Substitution: If you’re nut-free, try sun butter or a coconut spread instead of peanut butter for the zombie mouths.
- Fun Shapes: Instead of ghost sandwiches, cut shapes from Halloween-themed cookie cutters using whole wheat or gluten-free bread for a festive touch!
- Add Some Heat: Spice up the ghost peppers with a dash of hot sauce mixed into the icing for an unexpected zing that adventurous eaters will love!
- Healthier Sweeteners: Instead of icing sugar, experiment with drizzling a little honey on the marshmallows or using agave syrup for a healthier sweet treat.
Feel free to explore these variations while putting a personal spin on your board. For additional inspiration, check out the delightful Peachy Oat Snack that brings nutritious joy to snack time!
What to Serve with Spooky Halloween Snack Board for Kids
Create a delightful feast alongside this festive treat, ensuring your Halloween celebration is complete.
-
Crispy Veggie Platter: A colorful assortment of crunchy vegetables complements the sweetness of the snacks and adds a refreshing element.
-
Cheese Wedges: Savory cheese brings a creamy contrast that kids love, and they provide a nice balance to all the sweetness on the board.
-
Haunted Hummus: Pair with spooky-themed pita chips for a healthy, fun dip option that encourages kids to enjoy their veggies while keeping the Halloween spirit alive.
-
Spooky Fruit Fingers: Use banana or apple slices to create eerie “fingers” with almond slivers as nails, making a fun, healthy side that fits the theme.
-
Pumpkin Spice Popcorn: Sweet and seasoned popcorn offers that comforting autumn flavor, making it the perfect crunchy addition to the table.
-
Apple Cider: This warm, aromatic drink brings warmth and festive cheer, rounding out your Halloween spread with a cozy beverage that kids adore.
-
Dark Chocolate Treats: Include a few dark chocolate-covered fruits or nuts for a slightly healthier sweet finish that satisfies any chocolate cravings.
-
Mini Halloween Cupcakes: These festive sweets can be topped with spooky decorations, making for an irresistible dessert that’s both fun and delicious.
-
Candy Corn Trail Mix: Create a mix of nuts, seeds, and candy corn as a playful snack that kids can munch on throughout the festivities.
-
Ghostly Yogurt Parfaits: Layer yogurt, granola, and fruit in clear cups for a spooky dessert that looks as good as it tastes—perfect for adding some nutrition!
Halloween Snack Board Recipe FAQs
What kind of clementines should I use?
I recommend using sweet, juicy clementines to create pumpkin-like shapes. If clementines aren’t available, mandarin oranges make a great substitute since they have similar sweetness and texture.
How should I store leftovers after making the Halloween Snack Board?
If you have any leftovers, store them in an airtight container in the refrigerator for up to one day. This way, you can maintain the freshness and crunch of the various components. It’s best to keep items separate if possible to avoid sogginess.
Can I freeze any part of this Halloween Snack Board?
Yes, you can freeze individual components, such as diced cantaloupe and black grapes, for up to 3 months. Ensure they are stored in a tightly sealed container or freezer bag. Thaw them prior to assembly and keep in mind that the texture may change slightly after freezing.
What should I do if my chocolate doesn’t set properly on the skewers?
If your chocolate isn’t setting, try placing the skewers in the fridge for about 10-15 minutes to help them firm up. If the chocolate seems too runny after melting, you might need to microwave it for a bit longer or add a touch more chocolate chips until it reaches a thicker consistency.
Are there any dietary considerations for pets regarding the ingredients?
Absolutely! Some ingredients, such as chocolate and certain nuts, can be harmful to pets. Be sure to keep chocolate away from dogs and cats, and avoid any ingredients that are toxic to your pets. If you plan to share any leftovers, consult with your veterinarian about safe options for your furry friends.
Can I customize the Halloween Snack Board if my kids have allergies?
Very! This Halloween Snack Board is quite versatile. You can easily swap out items like peanut butter for sunflower seed butter or use gluten-free bread for the ghost sandwiches to accommodate allergies. Don’t hesitate to get creative with substitutes while ensuring everything remains fun and festive!
Delight Kids with This Fun Halloween Snack Board
Ingredients
Equipment
Method
- Start by peeling about 8-10 clementines. Cut celery sticks into 2-inch pieces to serve as the stalks. Insert celery pieces into the tops of clementines. Wrap in plastic wrap and chill for at least 30 minutes.
- In a bowl, mix 1 cup of icing sugar with a few tablespoons of cold water until thick. Dip sweet mini peppers into icing and attach edible sugar eyeballs. Refrigerate for 15-20 minutes.
- Dice 2 cups of cantaloupe into cubes. Assemble skewers with cantaloupe, black grapes, and white marshmallows. Melt 1/2 cup of dark chocolate chips and draw faces on marshmallows.
- Cut slices of white bread into ghost shapes. Spread peanut butter between two slices to make sandwiches. Use black olives as eyes. Chill for at least 15 minutes.
- Slice 2-3 apples into quarters. Spread peanut butter on apple slices and stack quarters. Add mini marshmallows for teeth and secure with toothpicks.
- On a large platter, arrange all prepared snacks creatively, filling any gaps with assorted shop-bought snacks.