

As I stood in my kitchen, the sharp smell of russet potatoes filled the air, transporting me back to sunny afternoons spent savoring crispy French fries. Who wouldn’t cherish those moments of biting into a perfect fry? Now, with my recipe for Pressure Canned French Fries, you can bring that delightful experience home with the benefit of convenience. By using pressure canning, you’ll have homemade fries ready to go at a moment’s notice, making snack time both effortless and satisfying. Not only are these fries a quick side dish that pairs beautifully with any meal, but they also offer a healthier alternative to takeout. Have you ever wondered how you could enjoy fries whenever the craving strikes? Let’s dive into the world of canning and discover how you can transform simple potatoes into an everyday treat!
Why Can You Canning French Fries?
Convenience: With pressure canning, you can prepare a large batch of crispy French fries and have them on hand whenever hunger strikes.
Quick Snacks: Skip the long wait for takeout! These prepped fries can be fried or baked in just minutes, making them a perfect snack or side dish.
Healthier Alternative: Enjoy homemade flavors without the preservatives or excess calories often found in fast food.
Versatile Use: Pair them with your favorite sauces, serve them as a side for grilled meats, or even incorporate them into casseroles.
Family-Friendly: Everyone loves fries! They’re a guaranteed crowd-pleaser, perfect for gatherings or family dinners.
Experience the joy of homemade goodness with these pressure canned fries and elevate your culinary game today!
Canning French Fries Ingredients
For the Fries
- Potatoes – Choose large russets for the perfect texture and flavor.
- Water – Soak the potatoes in water to remove excess starch for crispier fries.
- Salt – Use 1 tsp per quart or ½ tsp per pint to enhance flavor and preserve texture.
For Canning
- Boiling Water – This is essential for filling the jars and ensuring fries are fully submerged.
Unlock the magic of canning French fries today and keep delicious homemade treats at your fingertips!
Step‑by‑Step Instructions for Canning French Fries
Step 1: Prepare the Potatoes
Begin by peeling your large russet potatoes and cutting them into ½ to ¾ inch fry shapes. Aim for uniformity to ensure even cooking later. Once cut, visually inspect for any blemishes and remove them. This step is key in achieving excellent texture and flavor for your pressure canned French fries.
Step 2: Soak the Potatoes
Place your cut fries into a large bowl and submerge them entirely in water. Let them soak for about 3 hours, changing the water every hour to help remove excess starch. This soaking process is essential for getting that crispy texture when you later fry or bake the canned fries.
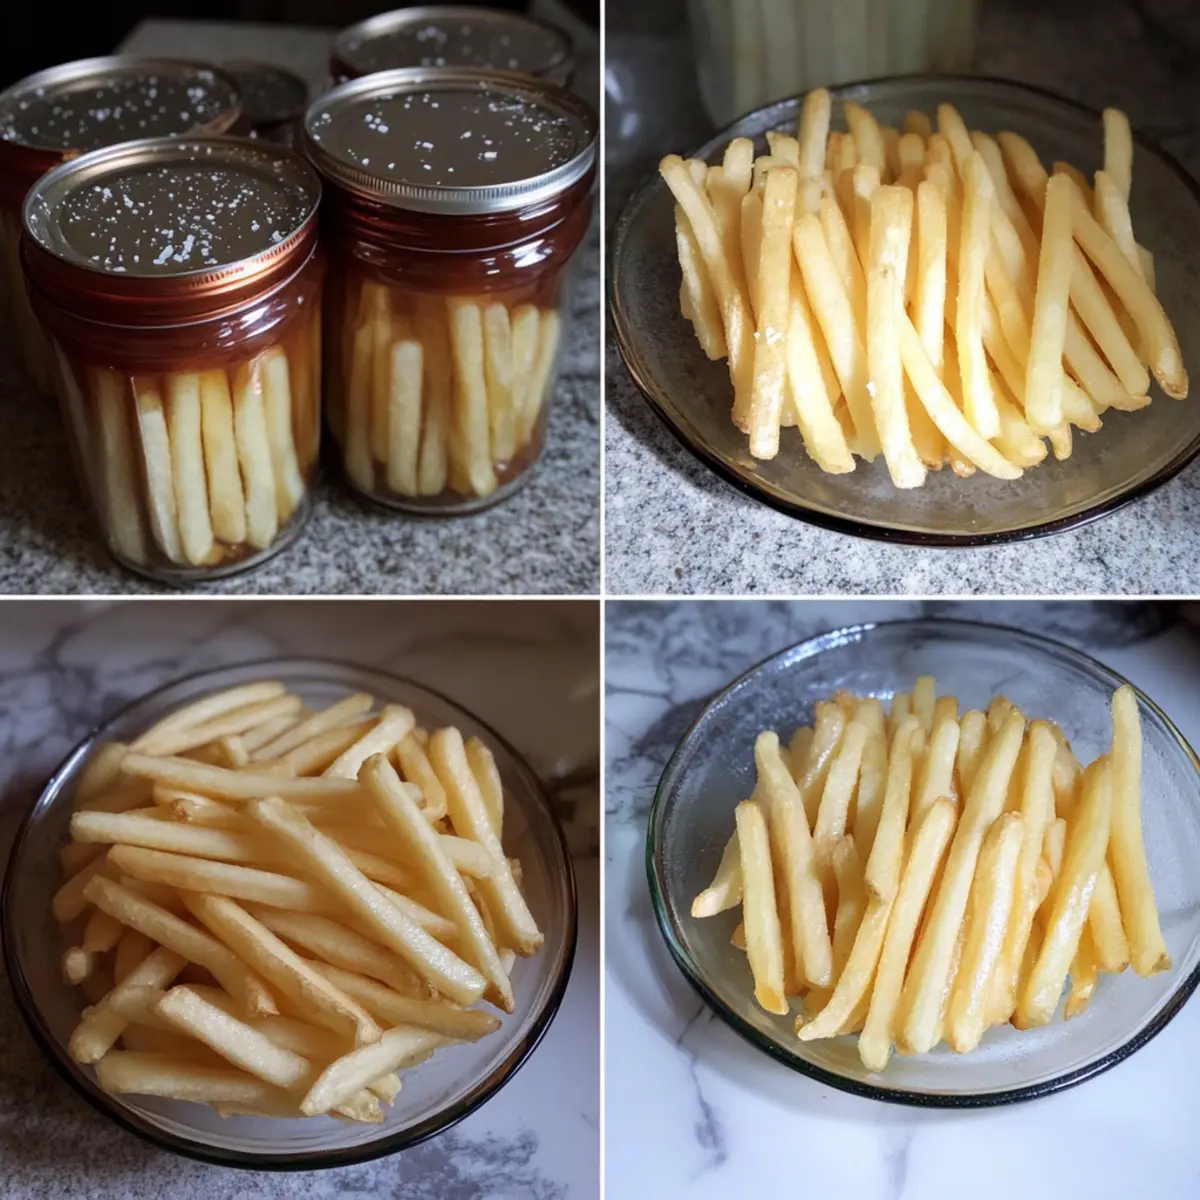
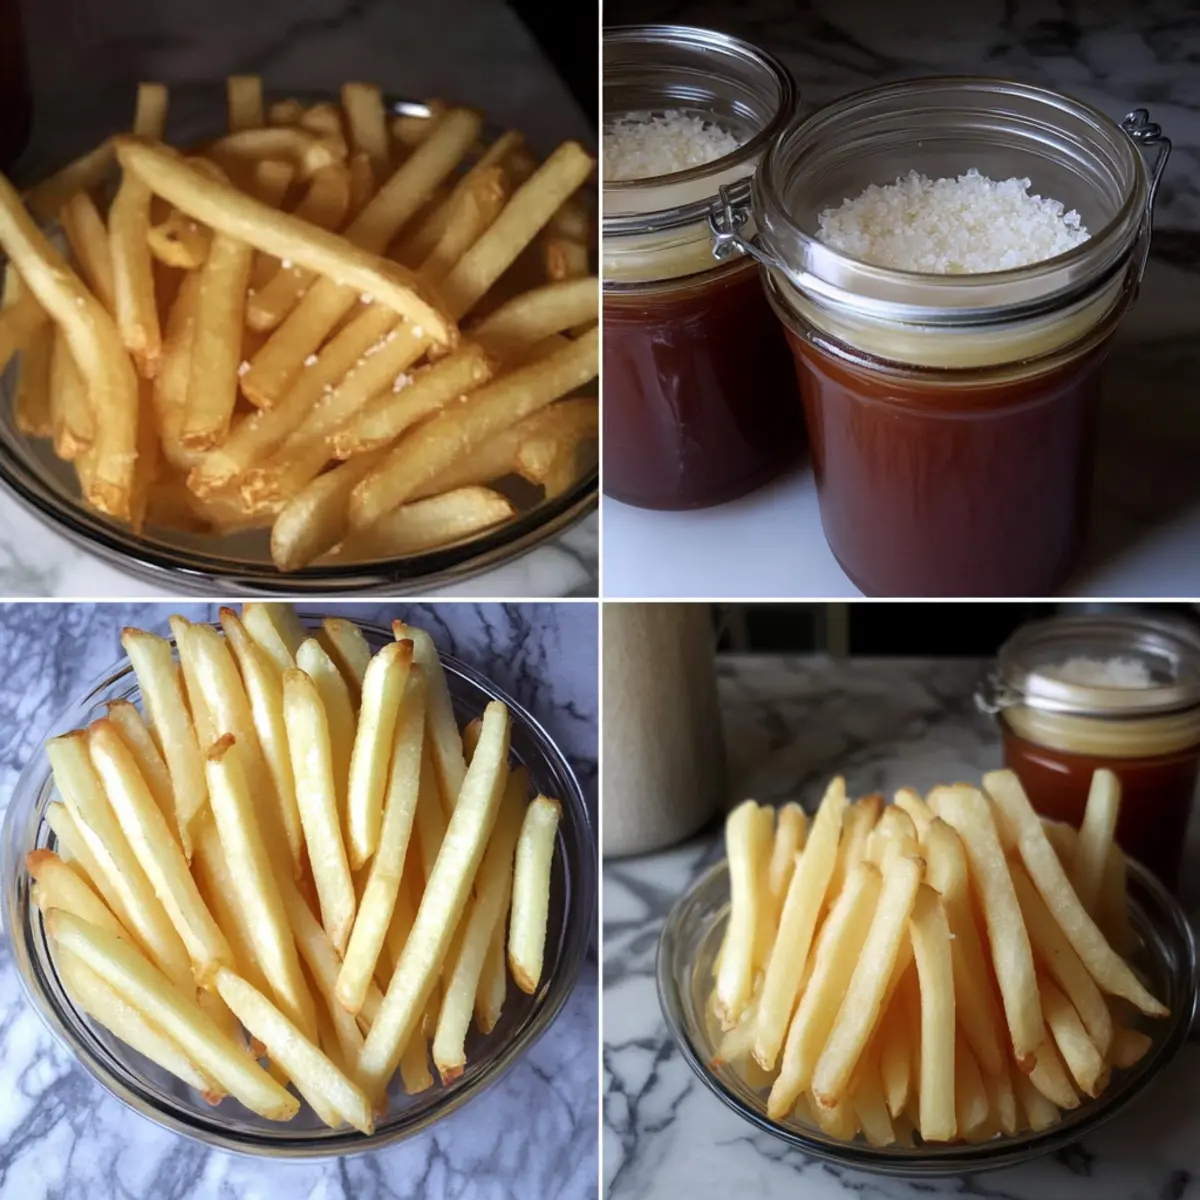
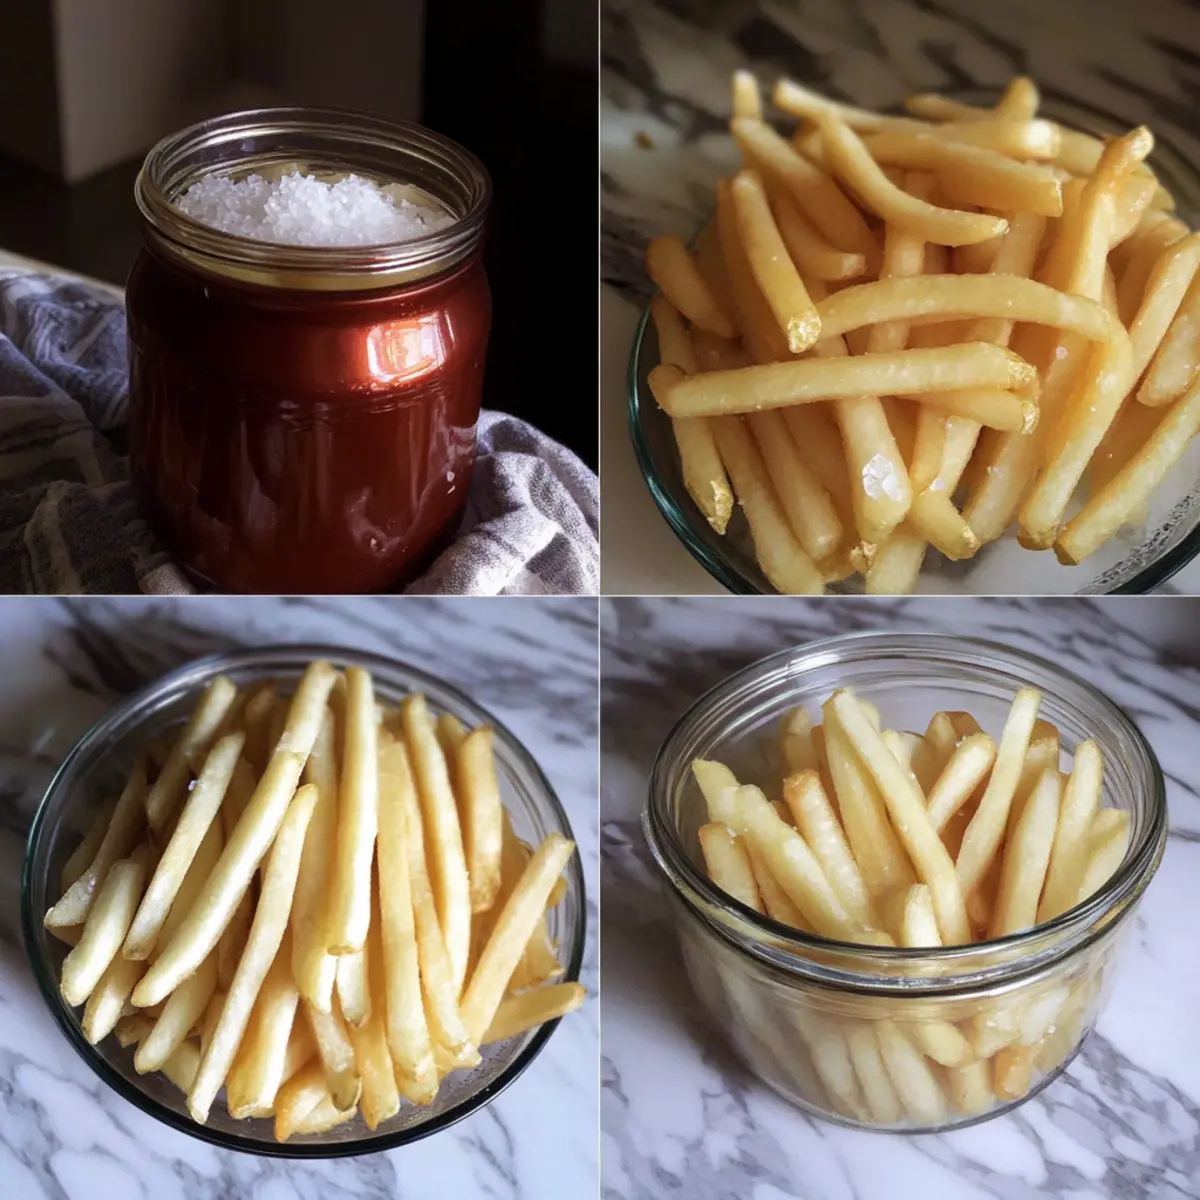
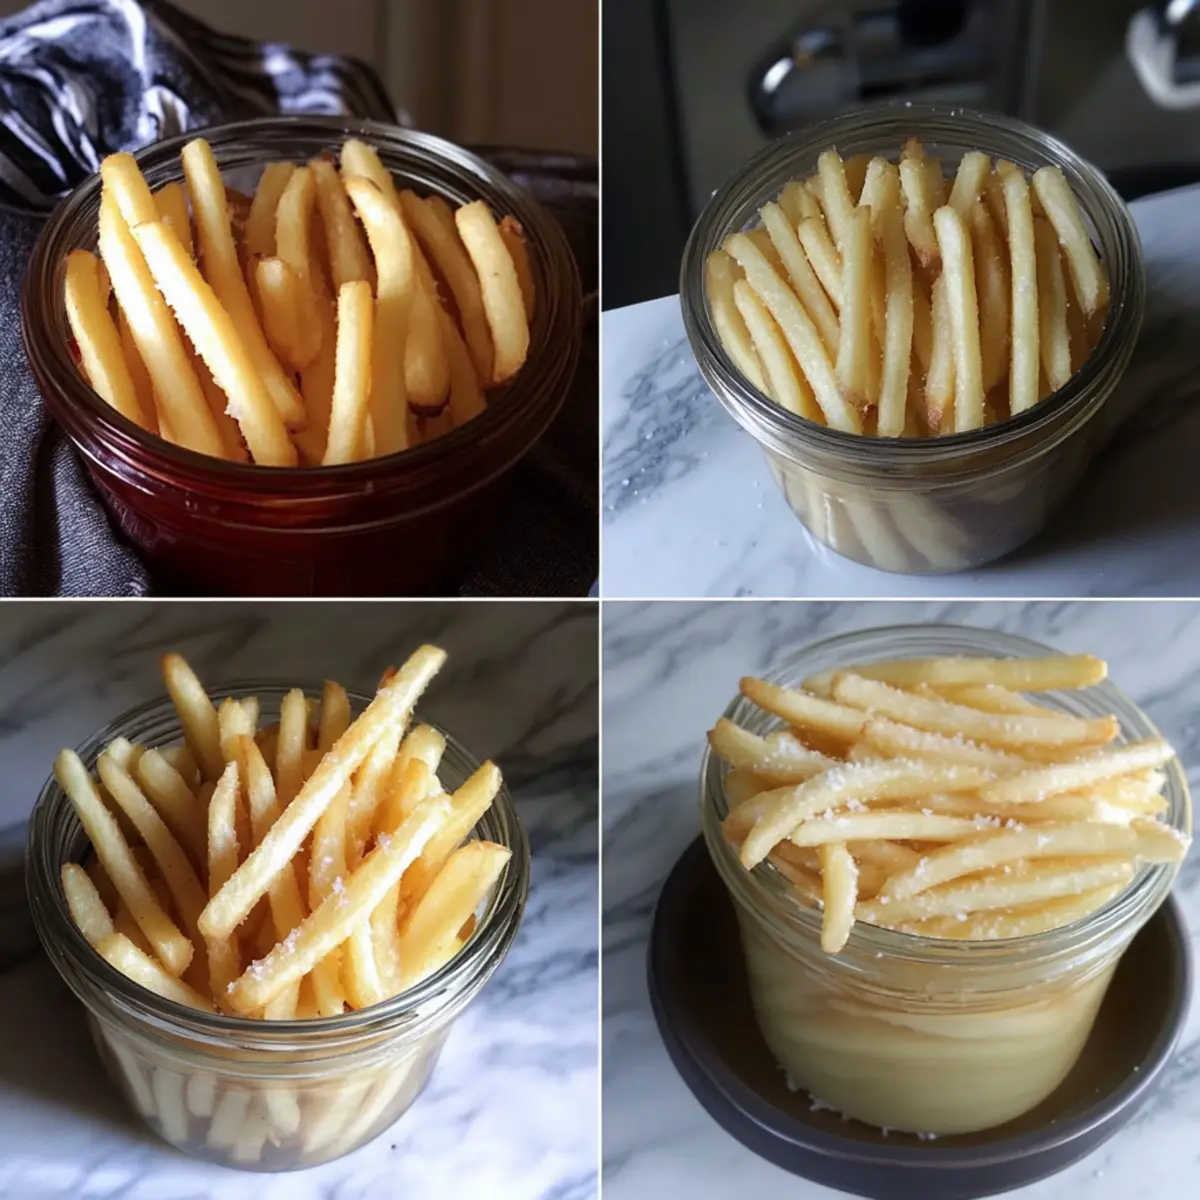
Step 3: Pack the Jars
After soaking, drain the fries well and begin packing them tightly into wide-mouth quart or pint jars. Stand them upright, leaving approximately 1-inch headspace at the top of each jar. Sprinkle the required salt into each jar; aim for 1 tsp per quart or ½ tsp per pint, ensuring the flavors penetrate the fries inside the jars.
Step 4: Fill with Boiling Water
Bring water to a rolling boil and carefully pour it over the packed fries in each jar. Make sure the fries are fully submerged under the water, maintaining the required headspace. This boiling water is crucial in preserving the fries during the canning process, helping them maintain their shape and texture.
Step 5: Pressure Can the French Fries
Secure the lids onto the jars, ensuring they are tightly sealed but not overly tight. Place the jars into your pressure canner, following the manufacturer’s instructions. Process the jars at 10 pounds of pressure for 35 minutes if using pint jars and 40 minutes for quart jars. This step locks in all the flavors and achieves that ideal preservation.
Step 6: Label and Store
Once the processing time is complete, allow the pressure to release naturally before removing the jars. Let them cool on a clean towel or countertop. After cooling, check the seals to ensure they are airtight. Label each jar with the date, and store them in a cool, dark place to preserve your pressure canned French fries for future snacking and meal enjoyment.
How to Store and Freeze Canning French Fries
Fridge: Store opened jars of canned fries in the fridge for up to 3 days. They must be refrigerated after opening to maintain freshness and flavor.
Freezer: If you wish to freeze fries, drain them first and spread them on a baking sheet to freeze individually for a few hours. Then transfer to an airtight container for up to 6 months.
Reheating: For best results, reheat in the oven at 400°F (200°C) until crispy, about 15-20 minutes. This method helps retain the delicious texture of your canned French fries.
Labeling: Always label storage containers with dates. While canned fries last up to 12 months in sealed jars, freezing extends their shelf life even further for your convenience.
Expert Tips for Canning French Fries
-
Pre-Soaking Matters: Don’t skip the soaking step! It removes excess starch, allowing for a perfect crispy texture when you later fry or bake the canned fries.
-
Uniform Cuts: Aim for consistent fry shapes. This ensures that they cook evenly and helps avoid soggy fries after processing.
-
Wide-Mouth Jars: Use wide-mouth jars for easy packing and removal of fries. This avoids breakage and makes serving much simpler.
-
Altitude Adjustments: If you’re at a higher altitude, remember to adjust your pressure canning settings. This is critical for achieving safe preservation.
-
Label for Freshness: Always label jars with the date. For optimal quality, consume your pressure canned French fries within 8 to 12 months.
What to Serve with Pressure Canned French Fries
Elevate your snack game with these delicious side ideas that perfectly complement the crispy, golden delights of canned fries.
-
Steak Frites: A classic pairing, juicy steak and crispy fries create a satisfying meal that feels indulgent yet comforting.
-
Garlic Aioli: This creamy, garlicky dip adds a rich flavor dimension to your fries, taking your snacking experience to the next level.
-
Fresh Garden Salad: The crispness of a fresh salad provides a refreshing contrast to the warm, crunchy fries, balancing out the meal perfectly.
-
Cheddar Cheese Sauce: Warm, gooey cheese drizzling over your fries turns a simple snack into a decadent treat everyone will love.
-
Spicy Dipping Sauce: A zesty sauce brings heat and flavor, making each bite of your canned fries an exciting journey for your taste buds.
-
Homemade Coleslaw: The crunch of coleslaw adds freshness and texture, making it an ideal companion for your fries at any gathering.
-
Cold Brewed Iced Tea: Pairing your meal with a refreshing iced tea offers a cool contrast, enhancing the overall experience of enjoying your French fries.
-
Chocolate Cake: For dessert, a moist chocolate cake brings a sweet finish, balancing the savory satisfaction of the fries wonderfully.
Make Ahead Options
Preparing your Pressure Canned French Fries is a fantastic way to save time for those busy weeknights! You can soak and cut the potatoes up to 24 hours in advance, storing them submerged in water in the refrigerator to maintain their freshness and texture. After packing the jars and canning the fries, they can be stored for up to 12 months in a cool, dark place. When you’re ready to enjoy them, simply fry or bake directly from the jar without thawing; they’ll be just as delicious! By prepping ahead, you ensure quick and satisfying meals are always within reach, making it easier to satisfy those cravings anytime.
Canning French Fries Variations
Feel free to get creative with your pressure canned French fries and tailor them to your taste preferences!
- Herb-Infused: Add dried herbs like rosemary or thyme to the jars for flavorful fries with an aromatic twist. The infusion of herbs will elevate your fries from simple to sensational!
- Spicy Kick: Incorporate red pepper flakes or minced jalapeños for a zesty version that adds heat to your fries. Perfect for those who crave a little fire with their snacks.
- Sweet Potato Swap: Use sweet potatoes instead of russets for a naturally sweet alternative. These fries pair wonderfully with a sprinkle of cinnamon after cooking!
- Garlic Flavor: Add smashed garlic cloves to the jars while packing to infuse rich flavor into your fries. Garlic lovers will delight in this savory touch!
- Vegan Option: Stick with potatoes and water, using only salt for flavor. You’ll have a delicious, plant-based side dish suitable for everyone at the table.
- Cheesy Twist: Before canning, sprinkle some grated cheese into the jars, allowing it to meld with the fries during processing for a cheesy treat!
- Curried Fries: Mix curry powder with salt to give your fries an exotic taste that’s both vibrant and bold. This unique flavor profile will surprise and delight your taste buds.
- Balsamic Blend: Add a splash of balsamic vinegar to the boiling water before pouring it over the fries. This unique twist will impart a sweet and tangy flavor that’s simply irresistible.
Dive into these variations and discover how you can turn classic pressure canned French fries into your customized culinary delight! For more creative potato dishes, check out my guide on homemade mashed potatoes or explore the vibrant flavors in roasted potato wedges. Happy canning!
Canning French Fries Recipe FAQs
What type of potatoes should I use for canning French fries?
Absolutely! For the best results, I recommend using large baking russets. Their starchy texture helps create that signature fry shape and familiar flavor, making them ideal for canning. Other varieties like Yukon Gold can work too, but russets provide the perfect crispiness.
How should I store my pressure canned French fries?
Store your jars of canned French fries in a cool, dark place, ideally between 50°F and 70°F. They will remain at peak quality for 8 to 12 months if the seals are intact. Always check for signs of spoilage, like dark spots or an off smell, before consuming.
Can I freeze canned French fries?
Yes, but it’s important to do it correctly! First, drain the fries and spread them out in a single layer on a baking sheet. Freeze them for a couple of hours until solid, then transfer them to an airtight container or freezer bags. They’ll stay good for about 6 months. When ready to cook, simply bake or fry from frozen to enjoy hot, crispy fries!
What should I do if my French fries turn out soggy after canning?
Soggy fries can be a letdown, but there’s hope! Make sure to follow the soaking step; it’s vital to remove as much starch as possible. Additionally, ensure the fry shapes are uniform, so they cook evenly. If they still seem soggy post-canning, try frying them directly from the jars instead of baking, as frying can crisp them up perfectly.
Are canned French fries suitable for pets?
While potatoes themselves are safe for pets in moderation, the added salt and potential preservatives in canned goods might not be ideal for them. Always check with your veterinarian before sharing any human food, including canned French fries, with your furry friends!
Can I use different seasonings when canning French fries?
Very much so! While this recipe keeps it simple with just salt for preservation, feel free to experiment with your favorite herbs or spices. Just remember, make adjustments to ensure the flavors don’t overpower the fries since they will be cooked later. Enjoy the process of customizing!
Canning French Fries: Crispy Homemade Treats Made Easy
Ingredients
Equipment
Method
- Prepare the Potatoes: Peel and cut russet potatoes into ½ to ¾ inch fry shapes. Inspect for blemishes and remove.
- Soak the Potatoes: Submerge the cut fries in a large bowl of water for about 3 hours, changing the water every hour.
- Pack the Jars: Drain the fries and pack them tightly into jars, leaving 1-inch headspace. Add the required salt.
- Fill with Boiling Water: Pour boiling water over the fries in each jar, ensuring they're fully submerged.
- Pressure Can the French Fries: Seal jars and process at 10 pounds of pressure for 35 minutes for pint jars and 40 minutes for quart jars.
- Label and Store: Allow the pressure to release, cool the jars, check seals, label with the date, and store in a cool, dark place.