

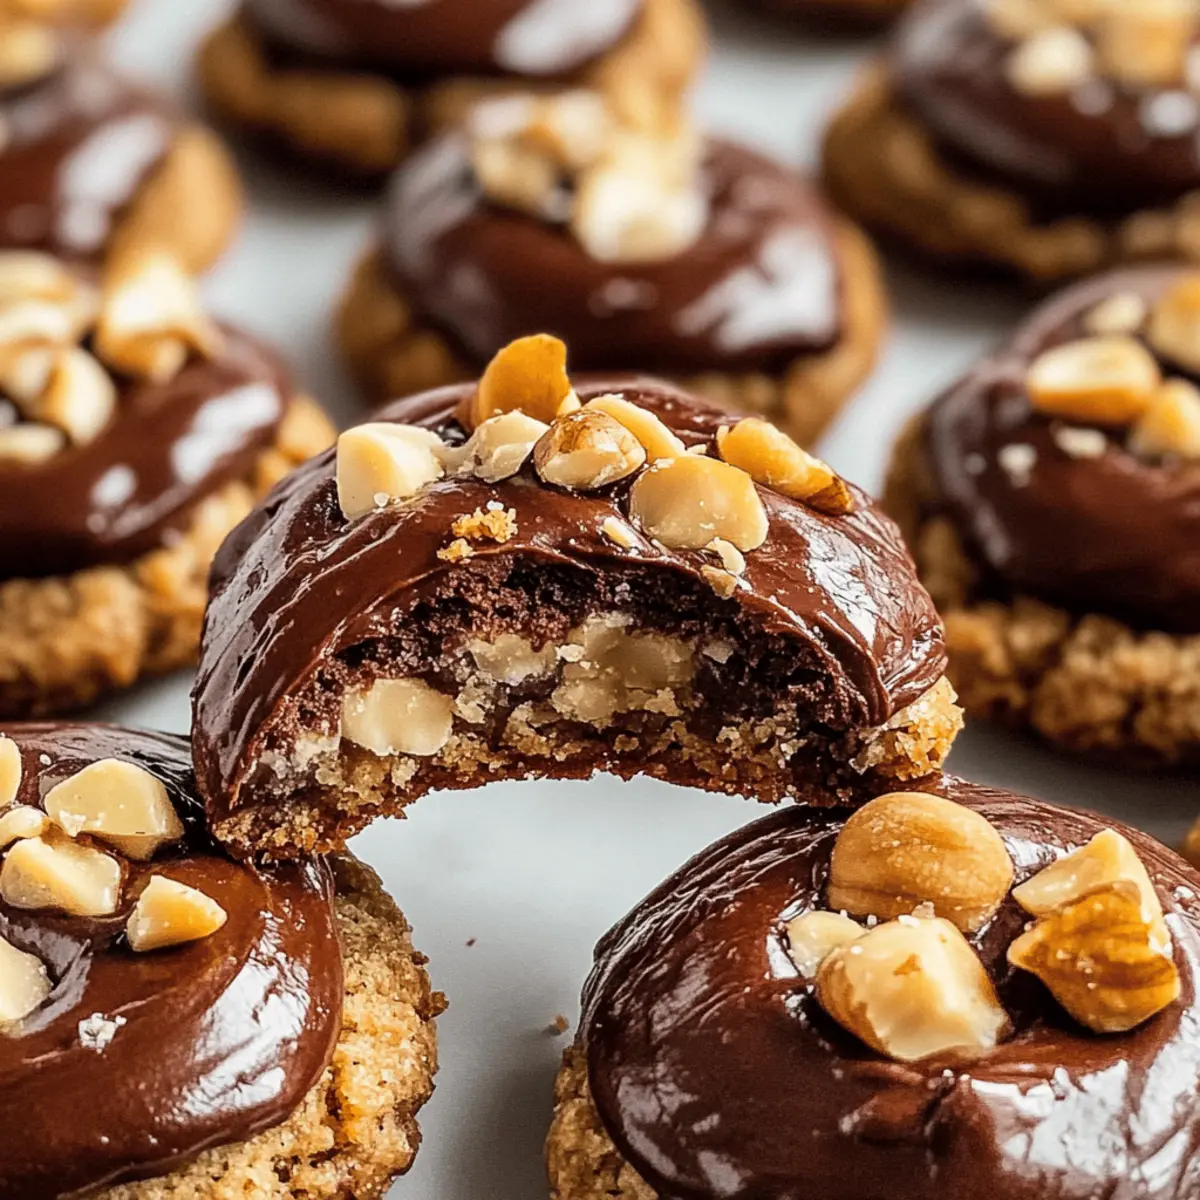
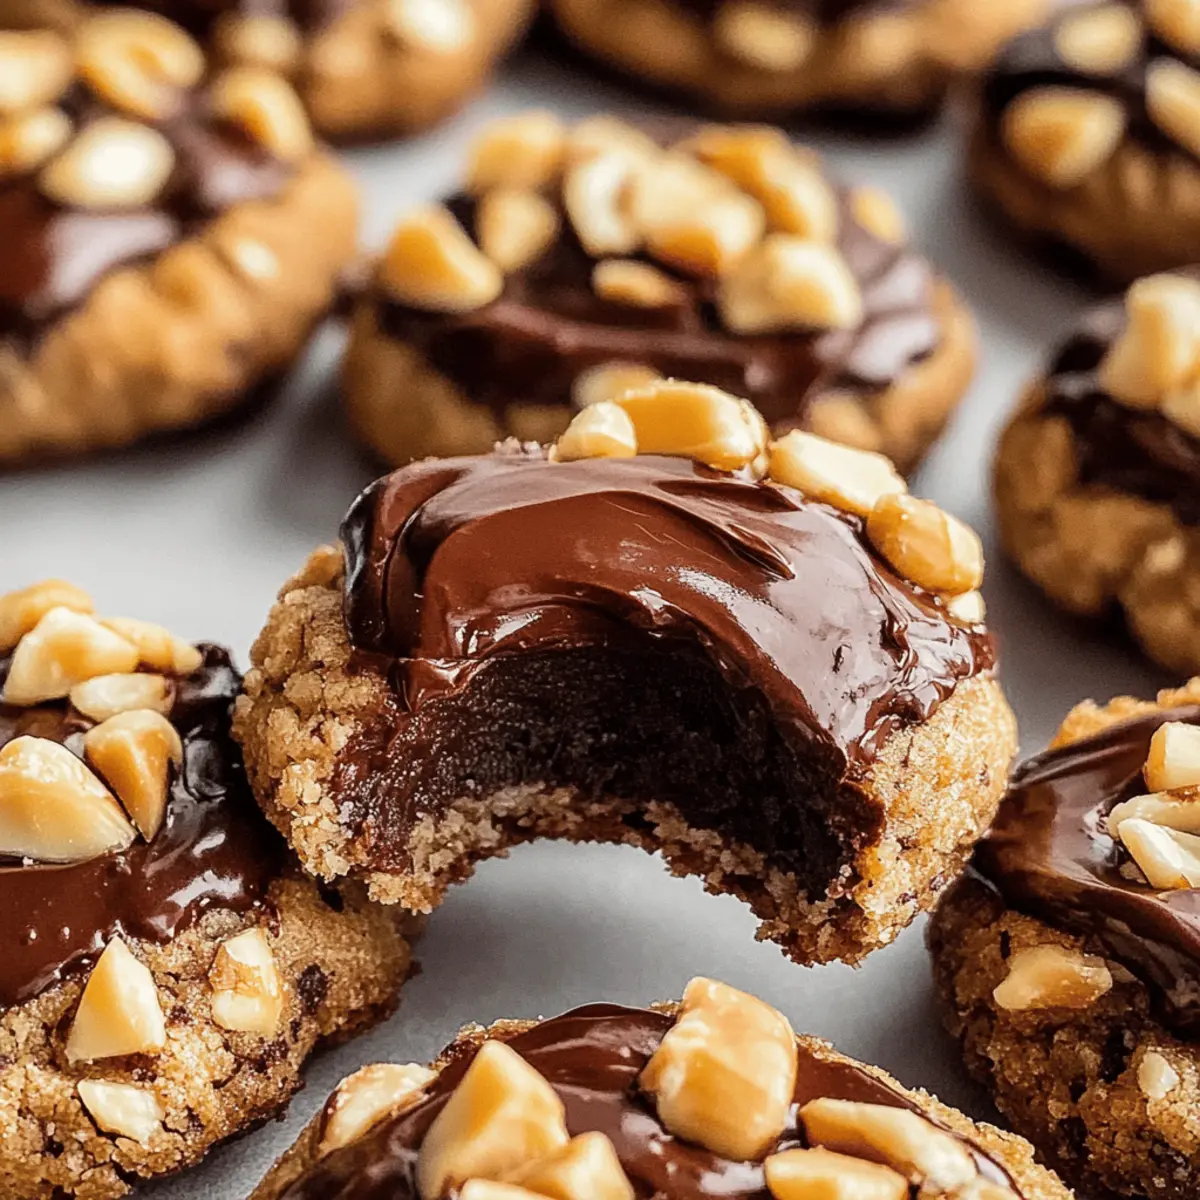
In the cozy embrace of my kitchen, where the perfume of chocolate dances with the nutty aroma of hazelnuts, I concoct a delightful treat: Chocolate Hazelnut Thumbprint Cookies. These little treasures are not only rich and chewy but also incredibly simple to whip up, making them a perfect go-to for any occasion. Each bite offers a unique indulgence, thanks to the luscious filling of chocolate hazelnut spread that melts harmoniously with the crispy texture of toasted hazelnuts. Plus, they make an excellent crowd-pleaser and are freezer-friendly, ensuring you can always have a sweet surprise ready for guests or that late-night craving. Are you ready to elevate your baking game and surprise your taste buds? Let’s dive into this delectable recipe!
Why Are These Cookies So Irresistible?
Indulgent Flavors: Each bite of these Chocolate Hazelnut Thumbprint Cookies bursts with rich chocolate and nutty undertones that keep you coming back for more.
Effortless Preparation: With a simple process, you can whip up a batch in no time—perfect for a last-minute gathering!
Versatile Alternatives: Feel free to switch up the nuts or try a different chocolate filling, like caramel for a fun twist.
Freezer-Friendly: Make a double batch and stash some away for surprising treats later.
Crowd-Pleaser: These cookies are guaranteed to impress, making them the highlight of any dessert table. They pair beautifully with a glass of milk or coffee, just like my Chocolate Covered Pretzel, ensuring your dessert experience is complete!
Chocolate Hazelnut Thumbprint Cookies Ingredients
For the Cookie Dough
- All-purpose flour – Provides structure and texture; substitute with gluten-free flour for a gluten-free version.
- Dutch-processed cocoa powder – Adds deep chocolate flavor; regular cocoa powder will work but may alter the color slightly.
- Salt – Enhances flavor and balances sweetness; don’t skip this vital ingredient!
- Unsalted butter – Offers moisture and richness; swap with dairy-free margarine for a dairy-free treat.
- Egg yolk – Binds ingredients and adds richness; whole eggs can be used, just save the egg white for another use.
- Milk – Contributes moisture; any milk works here, including non-dairy options.
- Powdered sugar – Provides sweetness and smooth baking texture; granulated sugar is a substitute, though it may alter the texture a bit.
- Vanilla extract – Enhances the cookie’s flavor; consider using homemade vanilla for a richer taste.
For the Topping
- Finely chopped hazelnuts (toasted) – Adds crunch and nutty flavor; pecans or almonds are great substitutes.
- Chocolate hazelnut spread – The luscious filling that’s central to the cookies; choose high-quality brands for the best flavor without palm oil, or opt for plain chocolate ganache as an alternative.
With these ingredients on hand, you’re one step closer to indulging in these decadent Chocolate Hazelnut Thumbprint Cookies! Happy baking!
Step‑by‑Step Instructions for Chocolate Hazelnut Thumbprint Cookies
Step 1: Preheat the Oven
Begin by preheating your oven to 180°C (355°F) for fan ovens or 160°C (320°F) for conventional ovens. As the oven warms up, line two baking trays with baking paper, ensuring a smooth and non-stick surface for your delightful Chocolate Hazelnut Thumbprint Cookies.
Step 2: Combine Dry Ingredients
In a medium bowl, whisk together the all-purpose flour, Dutch-processed cocoa powder, and salt until well blended. This mixture will create the foundation for your cookies, so ensure there are no lumps. Set this bowl aside as you prepare to mix the wet ingredients, creating a harmonious balance in your cookie dough.
Step 3: Mix Wet Ingredients
In another bowl, beat together the unsalted butter, powdered sugar, egg yolk, and milk using an electric mixer or whisk. Continue beating for about 3 minutes until the mixture becomes fluffy and pale in color. This step adds the richness and moisture needed for your Chocolate Hazelnut Thumbprint Cookies.
Step 4: Form the Dough Balls
Using an ice cream scoop, roll the dough into about thirty 1.5-tablespoon-sized balls. This uniform size ensures even baking across all cookies. As you shape the balls, take care to keep your hands lightly floured to prevent sticking. Arrange these dough balls on the prepared baking trays without flattening them, ensuring they maintain a nice round shape.
Step 5: Coat with Hazelnuts
Carefully coat each dough ball in the finely chopped toasted hazelnuts, ensuring an even coating all around. Place them back on the baking trays, giving them some space for baking. Bake the cookies in the preheated oven for about 8 minutes, watching for a slight firming around the edges while keeping the centers soft.
Step 6: Indent and Cool
Once baked, remove the trays from the oven, and while the cookies are still warm, use a measuring tablespoon to create indents in each cookie. This is essential for holding the luscious filling later. Optionally, if desired, use a larger cookie cutter to reshape the edges. Allow the cookies to cool completely on the trays for optimal texture.
Step 7: Fill with Chocolate Hazelnut Spread
Once cooled, fill each indent with a generous amount of chocolate hazelnut spread using either a spoon or a piping bag. This is the star of your Chocolate Hazelnut Thumbprint Cookies, adding that rich, luxurious sweetness. Allow the spread to set slightly before presenting these delightful treats to family or friends.

Storage Tips for Chocolate Hazelnut Thumbprint Cookies
Room Temperature: Store unfilled cookies in an airtight container for up to 4 days to keep them fresh and chewy.
Fridge: If filled, keep the Chocolate Hazelnut Thumbprint Cookies in the fridge for up to 3 days; they’ll stay delicious but may become slightly firmer.
Freezer: For longer storage, freeze the cookies in a single layer on a baking sheet, then transfer to an airtight container for up to 2 months.
Reheating: To enjoy warm cookies, reheat from frozen in a preheated oven at 180°C (355°F) for about 5-7 minutes, ensuring they are heated through but not overbaked.
Chocolate Hazelnut Thumbprint Cookies Variations
Feel free to personalize your Chocolate Hazelnut Thumbprint Cookies for a delightful twist that ignites your taste buds.
-
Nut Alternatives: Swap hazelnuts for pistachios or almonds to experiment with different flavors. Each nut brings its unique essence, enriching your cookie experience.
-
Flavorful Spreads: Try using white chocolate or caramel spreads instead of chocolate hazelnut for a deliciously sweet variation. The creamy, dreamy filling promises to astonish!
-
Salted Finish: Add a sprinkle of sea salt on top of the filling to create a sweet-savory balance that elevates the overall flavor. This simple touch intensifies the indulgence.
-
Gluten-Free Option: For a gluten-free twist, use a quality gluten-free flour blend in place of all-purpose flour. You’ll still maintain that excellent texture with a comforting taste!
-
Rich Cocoa Swaps: Experiment with Dutch-processed cocoa alternatives, like raw cacao powder, for a more intense chocolate flavor. Revel in the richness it brings!
-
Chewy Additions: Incorporate oats in the dough for a hearty texture that complements the cookie’s chewiness. Oats add a wholesome element for a lovable bite!
-
Nut Butter Filling: Instead of chocolate hazelnut spread, go for peanut butter or almond butter for an added nutty punch. This alternative gives a whole new flavor profile while still being divine!
Feel free to explore all these delicious variations for your cookies! You might want to check out other delectable treats on our site, such as my tempting Chocolate Chip Cookies that never disappoint, or indulge in a cozy fall vibe with our Pumpkin Smores Cookies. Enjoy your baking journey!
What to Serve with Chocolate Hazelnut Thumbprint Cookies
These delightful treats beckon for the perfect companions to elevate your dessert experience!
-
Creamy Vanilla Ice Cream: The rich creaminess contrasts wonderfully with the chewy texture of the cookies, creating a beautiful balance of flavors. A scoop on the side turns dessert into an indulgent treat.
-
Fresh Berries: Light and refreshing, the tartness of strawberries or raspberries cuts through the richness, bringing a pop of color and brightness to your plate.
-
Espresso or Coffee: The robust flavors of coffee complement chocolate beautifully, enhancing every bite you take. Plus, it’s a fantastic way to perk up after a sweet afternoon.
-
Chocolate Ganache: For the ultimate chocolate lover, drizzling some extra chocolate ganache over the cookies adds an indulgent layer of molten chocolate. A treat for the senses!
-
Whipped Cream: Light and fluffy, a dollop of freshly whipped cream provides a sweet yet airy contrast to the decadent cookies, making each bite heavenly.
-
Almond Milk: A sweet, nutty, dairy-free option perfect for those looking to pair their cookies with something light and refreshing without overpowering the flavors.
You’ll enjoy how these pairings elevate your Chocolate Hazelnut Thumbprint Cookies to new heights of indulgence!
Expert Tips for Perfect Cookies
-
Chill the Dough: Allow the cookie dough to chill for at least 2 hours. This helps maintain shape and prevents spreading during baking.
-
Measure Accurately: Use a kitchen scale for measuring ingredients. This ensures consistency and improves the texture of your Chocolate Hazelnut Thumbprint Cookies.
-
Watch the Bake Time: Keep an eye on the cookies while they bake. They should be firm around the edges but remain soft and chewy in the center for that perfect bite.
-
Indent Technique: If the indents don’t hold, make sure the dough was adequately chilled before baking, and that the cookies are still warm when you create the indents.
-
Experiment Wisely: Feel free to substitute nuts or spreads, but ensure the consistency remains similar to maintain the cookie’s structure and flavor profile.
Make Ahead Options
These Chocolate Hazelnut Thumbprint Cookies are perfect for busy home cooks looking to save time! You can prepare the cookie dough and refrigerate it for up to 24 hours before baking, helping to streamline your baking process. Simply roll the dough into balls, coat them in hazelnuts, and store them covered in the fridge. When you’re ready to bake, just pop them in the oven straight from the fridge, ensuring that they maintain their lovely chewy texture and flavor. For best results, avoid leaving them out at room temperature for too long before baking, as this can affect their shape. Enjoy freshly baked cookies with minimal effort, perfect for any occasion!

Chocolate Hazelnut Thumbprint Cookies Recipe FAQs
How do I know when my hazelnuts are the right ripeness for this recipe?
Absolutely! Look for hazelnuts that are firm and free from any dark spots or blemishes. Freshly roasted hazelnuts should have a slightly crunchy texture and a rich nutty aroma. For the best flavor, I recommend toasting raw hazelnuts in a dry skillet until they are golden brown—this brings out their natural oils and enhances their taste!
What’s the best way to store my Chocolate Hazelnut Thumbprint Cookies?
To keep these cookies fresh, store unfilled cookies in an airtight container at room temperature for up to 4 days. If you’ve already filled your cookies with the chocolate hazelnut spread, keep them in the fridge for up to 3 days. Don’t forget to use parchment paper in between layers to prevent sticking—your cookies will thank you!
Can I freeze my Chocolate Hazelnut Thumbprint Cookies?
Yes, you can absolutely freeze these delightful treats! Start by freezing the unfilled cookies in a single layer on a baking sheet for about 1 to 2 hours. Once frozen, transfer them to an airtight container or zip-top bag for up to 2 months. To enjoy them, simply reheat the cookies at 180°C (355°F) for about 5-7 minutes, and they’ll taste just like fresh!
What should I do if my cookie indents don’t hold?
Very common! If the indents don’t hold after baking, it usually means the dough wasn’t chilled adequately before baking. Make sure to chill the dough for at least 2 hours next time! Additionally, create the indents while they are still warm, as the cookies will be softer and easier to shape at that point.
Are there any allergy considerations I should be aware of with this recipe?
Absolutely! If you are baking for those with nut allergies, it’s best to substitute the hazelnuts with seeds like sunflower or pumpkin seeds for crunch. Additionally, ensure that your chocolate hazelnut spread doesn’t contain any allergens if you’re serving to guests with dietary restrictions. Another alternative is to use a dairy-free margarine if you have lactose intolerance.
What can I do if I don’t have enough ingredients?
No worries! For the best results, try to stick closely to the suggested ingredients, but if you’re short on all-purpose flour, a gluten-free blend will work wonderfully. You can also try regular cocoa powder instead of Dutch-processed; however, do note that this might slightly alter the color of your cookies. Remember, the more the merrier with experimentation!
Irresistible Chocolate Hazelnut Thumbprint Cookies You’ll Crave
Ingredients
Equipment
Method
- Preheat your oven to 180°C (355°F) for fan ovens or 160°C (320°F) for conventional ovens.
- In a medium bowl, whisk together the all-purpose flour, Dutch-processed cocoa powder, and salt until well blended.
- In another bowl, beat together the unsalted butter, powdered sugar, egg yolk, and milk until fluffy and pale, about 3 minutes.
- Roll the dough into about thirty 1.5-tablespoon-sized balls and arrange them on the prepared baking trays.
- Coat each dough ball in finely chopped toasted hazelnuts and bake for about 8 minutes.
- Create indents in each cookie using a measuring tablespoon while still warm to hold the filling.
- Fill each indent with chocolate hazelnut spread and allow to set slightly before serving.