

As I sat in the kitchen surrounded by the delightful chaos of flour and sugar, the smell of something magical wafted through the air. Enter the Halloween Puff Pastry Witches Brooms—my new favorite spooky snack! This easy recipe combines just two main ingredients with crunchy pretzel sticks, making them not only a treat for the taste buds but also a fun activity the kids can join in on. Perfect for your Halloween parties, classroom treats, or any whimsical get-together, these charming broomsticks are guaranteed to stir up smiles all around. Trust me, you’ll want to keep this recipe on hand for all your fall festivities! What will you fill yours with—Nutella, peanut butter, or maybe something even more magical?
Why Make Halloween Puff Pastry Brooms?
Adorable and Fun: These witches’ brooms are as cute as they are delicious, making them a hit with kids and adults alike!
Easy to Assemble: With only two main ingredients and pretzel sticks, anyone can whip these up in no time.
Perfect for Parties: They’re the ideal finger food for Halloween parties or themed gatherings, guaranteed to be a crowd-pleaser.
Customizable Filling: Feel free to switch up the Nutella for peanut butter or other tasty fillings, making each broom unique.
Quick Bake Time: You can have these spooky snacks ready in just 20 minutes, perfect for last-minute treats.
Let your creativity soar and pair these broomsticks with other festive options like Garlic Butter Shrimp for a delightful spread or Chicken Sausage Orzo for more hearty choices!
Witches Brooms Recipe Ingredients
For the Brooms
• Puff Pastry – This flaky base is key for creating the broomsticks; any brand will work wonderfully, such as Dufour or Pepperidge Farm.
• Nutella – A rich, chocolatey filling that kids adore; you can easily substitute it with your favorite nut butter or melted chocolate for a fun twist.
• Pretzel Sticks – These crunchy sticks serve as the broom handle, adding a delightful texture and whimsical charm to each treat.
For Brushing and Topping
• Milk – Use it to brush the tops before baking; this step helps to create a beautifully golden color that makes them irresistible.
• Sugar (in the raw) – Sprinkled on top for a sweet finish, enhancing both the look and taste of your spooky creations.
With this Witches Brooms Recipe, you are all set to create a delightful Halloween treat that will enchant both kids and adults alike!
Step‑by‑Step Instructions for Halloween Puff Pastry Witches Brooms Recipe
Step 1: Preheat and Prepare
Begin by preheating your oven to 350°F (175°C). While the oven heats up, take your two cookie sheets and line them with parchment paper to ensure easy cleanup and prevent sticking. This step sets the stage for your Halloween Puff Pastry Witches Brooms, creating the ideal baking environment.
Step 2: Roll Out the Puff Pastry
Once the oven is ready, roll out the defrosted puff pastry on a lightly floured surface. Cut the pastry into 12 pieces, each measuring about 2¾ by 3 inches. Aim for uniformity in size to help them bake evenly. You should see the delightful flaky layers begin to form as you work with the pastry.
Step 3: Add the Nutella Filling
Spread a teaspoon of Nutella onto the center of half of the pastry squares, using a spatula or back of a spoon to smooth it evenly. Place the remaining pastry squares on top to cover the Nutella, creating a mini sandwich. Be sure the sides align well for a successful folding in the next steps, making these Witches Brooms even more delightful.
Step 4: Cut the Slits for the Broom Bristles
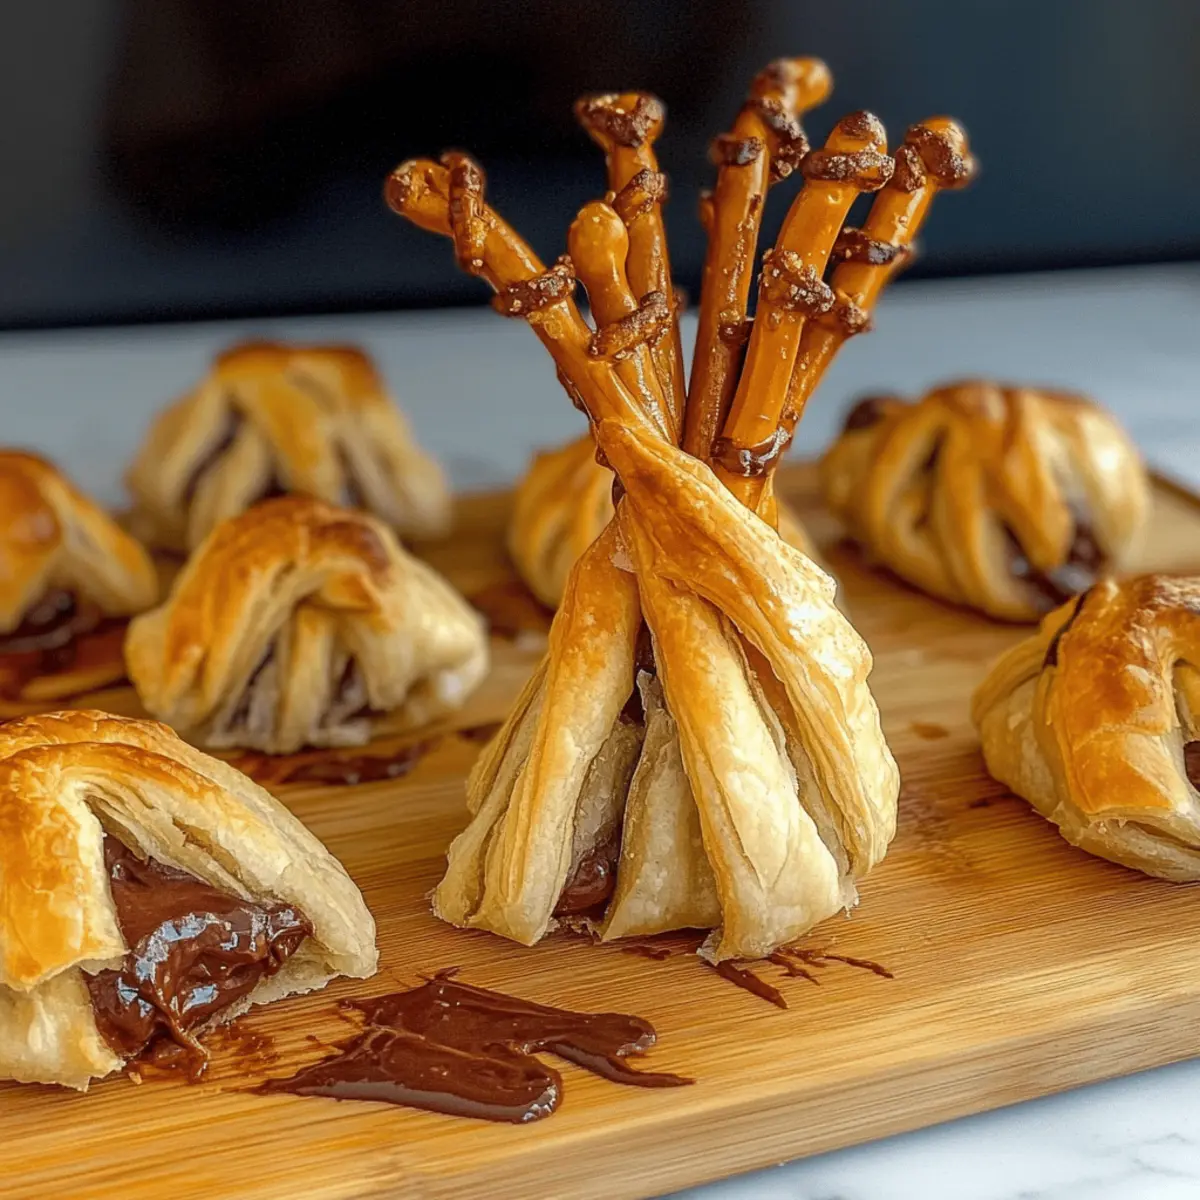
With a sharp knife or pizza cutter, carefully cut thin slits along the edges of the dough, leaving about a ¼ to ⅓-inch border at the top. These slits create the broom’s bristles and will puff up beautifully during baking. You should see the Nutella peeking out, hinting at the sweetness within!
Step 5: Assemble the Brooms
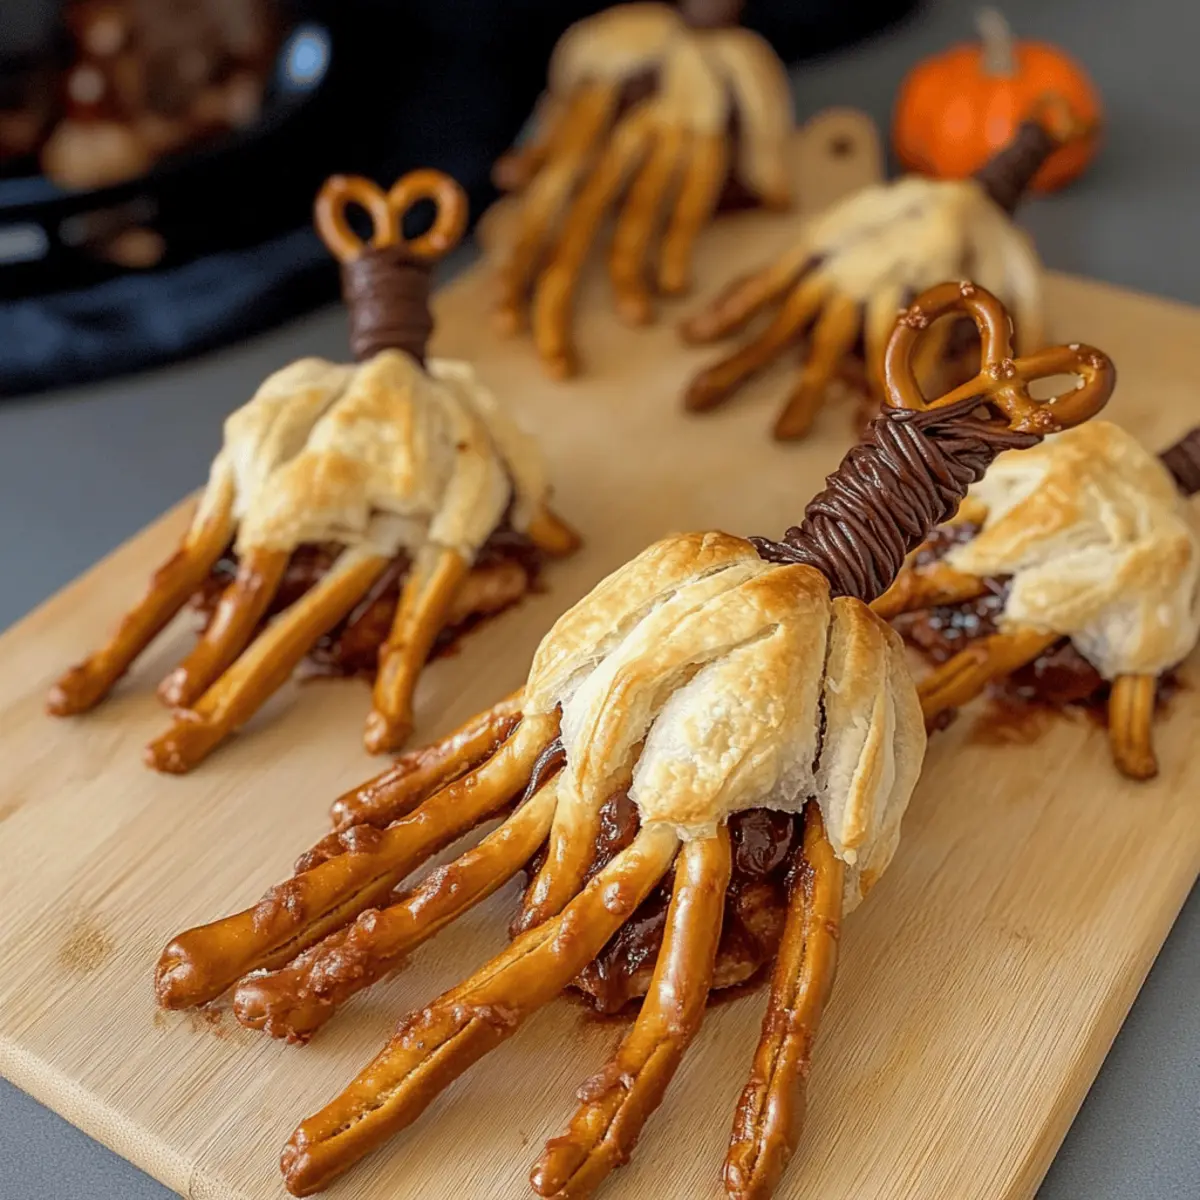
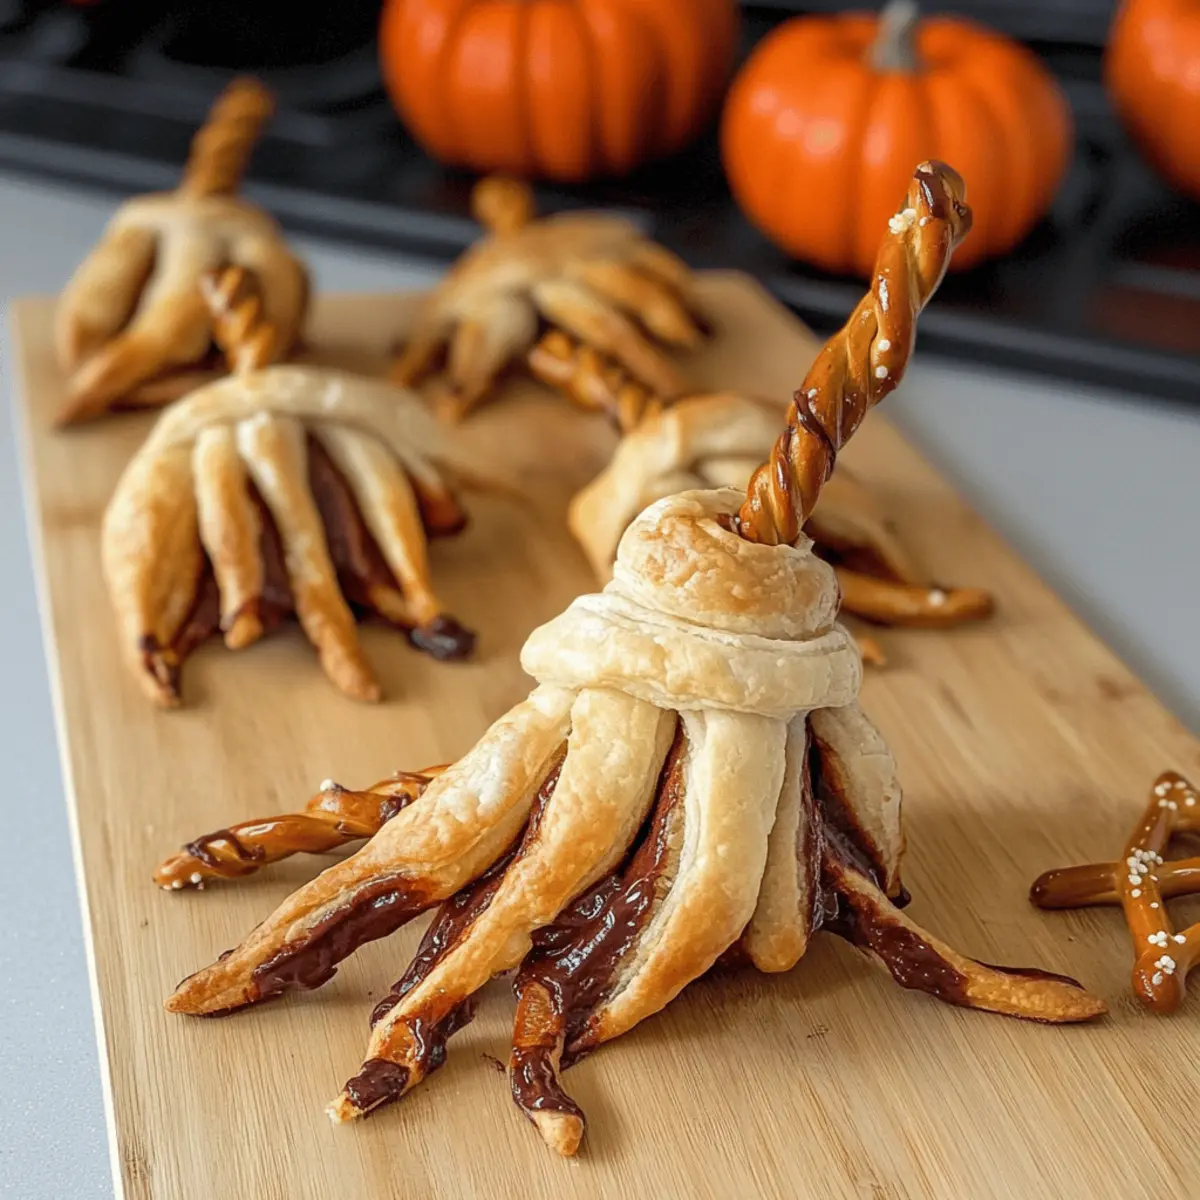
Next, take a pretzel stick and wrap one of the cut pastry pieces around its end, pressing gently to secure it. Place each assembled broomstick onto the prepared baking sheet, ensuring they’re spaced apart for even baking. The whimsical shape of the Witches Brooms should start to come alive as you work through this fun step.
Step 6: Brush and Sugar
Using a pastry brush, generously coat the tops of each broom with milk to achieve a lovely golden color as they bake. Once brushed, sprinkle the tops with raw sugar to give them a delightful crunch and shimmering finish. This finishing touch will enhance the appearance and flavor of your Halloween treats!
Step 7: Bake to Perfection
Pop the cookie sheets into the preheated oven and bake for 15-20 minutes, or until the witches brooms are puffed and golden brown. Keep an eye on them during baking to prevent over-browning. The delightful aroma of the pastries will fill your kitchen, creating an irresistible anticipation for these spooky snacks!
Step 8: Cool and Serve
Once done, remove the brooms from the oven and allow them to cool on the baking sheet for a few minutes before transferring them to a wire rack. It’s crucial to let them cool completely to maintain their crispiness. Now, your Halloween Puff Pastry Witches Brooms are ready to enchant your guests!
Make Ahead Options
These Halloween Puff Pastry Witches Brooms are perfect for meal prep, making your party planning a breeze! You can assemble the broomsticks up to 24 hours in advance; simply prepare them up to the point of baking, then cover them tightly with plastic wrap and refrigerate. This method helps keep them fresh while allowing you to save time on party day. To maintain their crispiness, bake them right before serving—just brush with milk and sprinkle with sugar, then pop them in the oven until golden brown. Your guests will enjoy these delightful treats just as much, even when made ahead!
How to Store and Freeze Witches Brooms Recipe
Room Temperature: Store leftover Witches Brooms at room temperature in an airtight container for up to 2 days. They may lose some crispness but will still be delicious.
Fridge: If you prefer to keep them longer, refrigerate the Witches Brooms in an airtight container for up to 3 days. Reheat in the oven for a few minutes to restore some crunch.
Freezer: For longer storage, you can freeze the assembled but unbaked Witches Brooms for up to 1 month. Just place them on a baking sheet to freeze individually before transferring them to a freezer-safe bag.
Reheating: When ready to enjoy, bake directly from frozen at 350°F for 20-25 minutes until golden and puffed.
Tips for the Best Witches Brooms Recipe
Texture Matters: Use chilled puff pastry for the flakiest brooms; warm pastry can lead to less impressive puff.
Perfect Slits: Cut slits evenly and carefully to achieve the classic broom look—too deep or shallow can affect presentation.
Flavor Variations: Experiment with different fillings; switch Nutella for other spreads to make your Witches Brooms Recipe uniquely yours.
Keep an Eye on Bake: Baking times can vary depending on your oven; watch closely to prevent over-browning or burning.
Serve in Style: Present these spooky treats on a festive platter, and pair them with other Halloween goodies for a delightful dessert spread.
What to Serve with Halloween Puff Pastry Witches Brooms?
Elevate your Halloween gathering by pairing these charming broomsticks with delightful accompaniments that enhance the festive spirit.
- Creepy Cheese Platter: Create a selection of haunted cheeses and crackers that will intrigue your guests and offer a savory contrast.
- Hearty Pumpkin Soup: Warm and creamy, this seasonal favorite complements the sweetness of the brooms, making for a cozy pairing.
- Ghoulish Fruit Salad: Toss in seasonal fruits like apples, pears, and grapes, providing a fresh, juicy contrast to the pastry.
- Spooky Sugar Cookies: Decorate these with Halloween-themed icing for a playful treat that complements the broomsticks’ sweetness.
- Chilling Chocolate Milkshakes: Serve these as a fun, festive drink that kids will love, and makes an engaging contrast to the light pastry.
- Ghostly Vanilla Ice Cream: Scoop this creamy dessert alongside the brooms; it’s the perfect sweet ending for a spooky feast.
- Toasty Marshmallow Hot Chocolate: A rich, warming drink to pair with the brooms, creating a comforting atmosphere on chilly nights.
- Festive Candy Corn: Add a bowl of these colorful treats to the mix for a sweet crunch that’s synonymous with Halloween celebrations.
Mix and match these options to craft an enchanting Halloween menu that will leave your guests spellbound!
Witches Brooms Recipe Variations
Feel free to get creative with these delightful broomsticks and customize them to suit your taste and dietary needs!
- Nut-Free: Substitute Nutella with sunflower seed butter for a nut-free option that still packs a delicious punch.
- Vegan Delight: Use coconut milk instead of regular milk for brushing and opt for dairy-free chocolate spread for a vegan-friendly treat.
- Spicy Twist: Add a sprinkle of chili powder to the melted chocolate filling for a surprising kick that kids will find thrilling!
- Sweet Cinnamon: Mix sugar with cinnamon before sprinkling it on top for an added layer of warm, sweet flavor.
- Fruity Fun: Swap out Nutella for a layer of fruit preserves or jam, like raspberry or strawberry, for a fruity explosion in every bite.
- Shape Shift: Experiment with different shapes of puff pastry to create mummies or ghosts, making your creations even more imaginative for Halloween.
- Lil’ Broomsticks: For mini versions, cut the pastry into smaller squares and use pretzel sticks broken in half, perfect for little hands to enjoy.
- Chocolate Drizzle: After baking, drench the tops with melted white or dark chocolate for an over-the-top sweet finish that looks as good as it tastes.
These Witches Brooms will wow at your Halloween parties or cozy family nights, so why not pair them with a delicious main dish like Sausage Bow Tie or some Corn Chicken Rice for a real crowd-pleaser? The possibilities are endless, just let your imagination soar!
Halloween Puff Pastry Witches Brooms Recipe FAQs
How do I select the best puff pastry for this recipe?
Absolutely, choosing high-quality puff pastry can elevate your Witches Brooms Recipe! Look for a pastry that feels cold to the touch and with minimal cracks. It should be smooth and pliable to ensure good puffing. Brands like Dufour or Pepperidge Farm are reliable choices that deliver excellent results.
What is the best way to store leftover Witches Brooms?
To keep your Witches Brooms fresh, store any leftovers at room temperature in an airtight container for up to 2 days. They may lose some crispness but will still taste delightful. Make sure to line the container with a paper towel to absorb any excess moisture!
Can I freeze the Witches Brooms before baking?
Yes! You can freeze the assembled but unbaked Witches Brooms for up to 1 month. Simply place them on a baking sheet lined with parchment paper so they don’t stick together, freeze until solid, then transfer to a freezer-safe bag. When you’re ready, bake them straight from frozen at 350°F for 20-25 minutes.
Why are my Witches Brooms not puffing up as expected?
This can happen if the puff pastry is too warm before baking. Make sure you keep it chilled until it’s time to bake. If the slits are too deep, the pastry may lose its structure and not puff properly. Aim for perfect, even slits that leave a small border at the top!
Is this recipe suitable for kids with nut allergies?
Certainly! While Nutella is a popular filling, you can substitute it with any safe alternative that fits your dietary needs, such as sunflower seed butter or caramel sauce. Always ensure that any substitute is nut-free and safe for the children’s dietary restrictions.
How long does it typically take to prepare these Witches Brooms?
You can whip up these charming treats in about 45 minutes, which includes prep and baking time! The more the merrier when it comes to getting kids involved in rolling, filling, and assembling the broomsticks, making for a fun festive activity.

Easy Witches Brooms Recipe that Spooks and Delights Kids
Ingredients
Equipment
Method
- Preheat your oven to 350°F (175°C) and line two cookie sheets with parchment paper.
- Roll out the defrosted puff pastry on a lightly floured surface and cut into 12 pieces, each about 2¾ by 3 inches.
- Spread a teaspoon of Nutella onto the center of half the pastry squares and top with remaining pastry squares.
- Cut thin slits along the edges of the dough to create broom bristles.
- Wrap a pretzel stick with one of the cut pastry pieces, pressing gently to secure, and place on the baking sheet.
- Brush the tops with milk and sprinkle with raw sugar.
- Bake for 15-20 minutes until puffed and golden brown.
- Cool on the baking sheet for a few minutes before transferring to a wire rack.